Microblading/Microshading is a semi-permanent treatment which will fade over time but will never fully disappear which makes it extremely important when choosing the right brow artist for you! Let’s see if we can help you make that decision by giving you all the information you need.
Microblading is a process which includes implanting pigment into the skin using ultra fine blades to create soft, natural hair strokes. This gives the impression of fuller, thicker brows especially for those who have naturally more fine or light hair. The hair strokes created will look like more natural hair strokes. As well as microblading, we also offer a slightly different technique called Microshading. Microshading involves using a blade that has more pins to create a more powdered, filled in look. Instead of placing pigment ink into the skin in the form of hair strokes, microshading is where the pigment is flicked under the skin in little pin-like dots.
Sounds scary right? Here, at the salon we make it our utmost priority to make sure our clients feel comfortable with the treatment they are about to commit too. Microblading consists of 3 different appointments. The initial appointment is a 30-minute in-depth consultation, then the main microblading appointment, and finally a 6-8 week top up.
What happens at my consultation?
During your 30-minute consultation you will be able to have a long, detailed conversation with your brow artist about all the things that you need to know such as what the procedure consists of, the different styles of microblading and you have the chance to ask as many questions are you like. Of course, we want you to feel at ease and informed about microblading. The consultation is important because it allows us to manage your expectations and decide whether this treatment is the right one for you and your lifestyle.
There are a few forms that you will need to fill out at this stage of your microblading journey including your medical history, personal details and the all-important patch test form! The patch test involves applying a small amount of the pigment ink behind one of your ears so we can determine whether a potential reaction could occur. However, the risk of this is very minimal. Some people may be worried that an existing health condition may prevent them from having the treatment. In most cases, all we need is a doctors note to confirm your health care provider is happy for us to go ahead.
The brow artist will also get you to read some additional forms to ensure you are aware of the aftercare and are prepared for what to expect after you’ve had the treatment. We think it is important that you understand everything as best as you can when it comes to your microblading experience. In our eyes knowledge is power!
What happens at my microblading appointment?
Mapping out
The mapping out process is how we determine the shape of your new brows. There are 3 main points that we mark out to ensure the shape is as symmetrical as possible and follows the client’s natural brow and bone structure. These points are where the front of the brow should start, where the arch should be and where the tail should finish. All these marks will then be meticulously joined
together creating your brow shape. The brow artist will perfect the mapping out using an eyebrow pencil and concealer before showing you. Then, together you can make any adjustments until you are both happy and confident to begin the treatment.
Main procedure
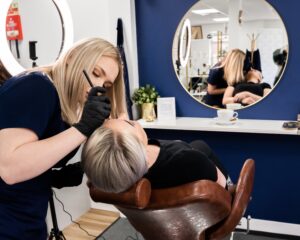
Once you and your brow artist are happy with the shape that has been drawn out, it will be time to start the main appointment. The microblader will put on all their PPE (personal protective equipment) and prepare their station before going ahead with the treatment. I mean hygiene and health and safety is important for all of us, right? Then its time to start.
The process begins with a first pass on one brow, using hair strokes in the direction of the natural hair growth to ensure a flawless blend. The hair strokes made are all within the mapped-out area as going out the pre-drawn shape would cause the brows to look uneven. Once the first pass has been done on one brow, your artist will then move on to the other eyebrow following the same positioning and direction as the first to achieve symmetry. After each pass, your brow artist will apply a layer of pigment onto the brow to allow the ink to settle into the new hair strokes made with the microblade, along with the cooling gel to ensure the client is as comfortable as possible throughout the treatment. Don’t worry, this is only slightly stingy for a couple of seconds.
Then a second pass will be done on each brow. This is to go over any hair strokes which may have been too light the first time. Applying the pigment ink step is repeated. If the correct depth is not achieved the pigment will be pushed out during the healing process which creates the risk of losing a lot of the hair strokes and shape created at this appointment. What we call the filler hairs are then created, which are the hair strokes that are all within the outline that we have just done on our first and second pass. After the hair strokes have been completed on both brows, this is when your artist would start your microshading if that is the style you have chosen.
Just like during the mapping out stage, your brow artist will then show you your new eyebrows so you can make any adjustments or tweaks if needed. It is important to remember at this stage the brows are going to be significantly darker than they will be when healed, so no need to panic if they are darker than you expected because we promise they’ll settle in! Now, you’ll just need to make sure you follow the aftercare steps carefully, and we’ll see you in 6-8 weeks.
Aftercare
Microblading aftercare is essential to ensure good results. Although you would have already read up on the aftercare advice that we provide prior to your main appointment, you will receive an aftercare leaflet and email from your artist to ensure you have the best chance of achieving the best possible results. This part is your responsibility and believe me, your brow artist will be able to tell who has been following our aftercare advice, and who hasn’t! The aftercare we advise is as follows;
- Blot eyebrows with a clean tissue for the first hour post treatment to ensure no build-up of lymph.
- 2 hours post treatment gently clean brows with sterile water, blot dry and apply a thin layer of cream.
- Repeat above again 4 hours post treatment.
- Apply cream 2-3 times a day for 7 days or until fully healed.
- Keep brows dry for 7 days.
- Avoid any cardio for 7 days.
- Do not apply makeup to the brows until they are completely healed.
- Avoid direct sun exposure (including sunbeds) for two weeks post treatment.
- Do not pic, peel or rub at your brows, allow flaking skin to shed naturally.
What happens at my top up?
The top-up is the third stage to your microblading journey! Your microblading should have healed at this point and we should have the main shape and style finished. The touch up is required to go over any hair strokes that have faded during the healing process which is completely normal and could have happened for many reasons such as sun exposure, excessive scabbing/flaking and even if some hair strokes were applied too lightly to begin with. Also, any colour adjustments can be made at this appointment and if you are already addicted and wanting a little more from your brows, we can add a little shading too!
Now you have been freshened up, you are all set for the next 12 months! See you in one year.


